Flash the DD-WRT firmware onto your WLAN wireless bridge router
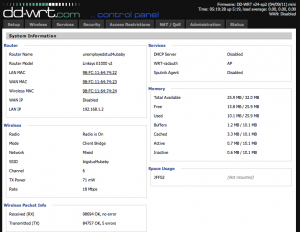
Next, flash the router with DD-WRT per the instructions provided on DD-WRT.com. For my E1000, I connected the router to my PC via a standard ethernet cable (on the E1000, I used one of the ethernet ports, not the WAN port). Your router should have a default IP address, admin account and password that will allow you to access the router’s configuration utility via a web browser. Follow the directions that came with your router (Google is handy if you don’t have directions) to access the configuration utility, and locate the firmware upgrade page. Once I found this page, I downloaded the DD-WRT flash file, decompressed it, and uploaded it to my router via the Cisco firmware upgrade utility. If you want to be safe, backup your existing router firmare in case you make a mistake or want to go back. Once the flashing process completes, do a complete reboot of the router (Here are tips to make sure you completely reboot your router). Once the reboot is complete, point your browser to 192.168.1.1 and login using DD-WRT credentials (click here for more information). If you now see a different configuration menu that looks like the DD-WRT menu below, continue to the next step.
Here’s a look at the DD-WRT configuration menu

Configure DD-WRT to make your WLAN router into a wireless bridge
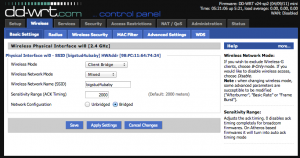
You’re almost done, now you just need to configure the router to be a wireless bridge in DD-WRT. Go into DD-WRT and get comfortable with the various pages and settings. Next, go to the wireless menu tab and select “client bridge” under wireless mode. On the same screen I also entered my Wireless Network Name where it says Wireless Network Name (SSID). I suggest using bridged mode – that way everything uses automatic network configuring from the Uverse WLAN router, better known as DHCP. Under setup, Advanced routing, also make sure the operating mode is set to “router” and not “gateway”. Check that you’ve entered the correct information under setup, basic setup, network setup – I had to update the Gateway and Local DNS to my Uverse router’s settings. The last step is to tether the wireless bridge to your 2Wire router. I set my DD-WRT router to use IP address 192.168.1.2. Under wireless security, I entered my 2Wire router’s WEP security code. This way the DD-WRT router now connects to your 2Wire router as just another wireless device. If I log into the 2Wire router, I don’t see anything listed for IP address 192.168.1.2, instead I only see the IP addresses for devices attached to the DD-WRT router. It truly is a wireless bridge that even extends the DHCP service of my Uverse router automatically.
DD-WRT is an awesome program, I imagine Cisco doesn’t want you to get your hands on it because you should have to pay for all the functionality it provides. You can turn the WAN port into another LAN port by configuration, plus it has cool monitoring data. My router never seems to go above 1% CPU usage and always has 80%+ memory available. I provided my wireless config below in case it helps.
My DD-WRT wireless configuration menu

If you have questions or other suggestions, please comment below – thank you!


